Archive:
Oops, I missed a week and the devlog is late. Sorry! Game Dev and all that. Shipping late's what we do...
I put off posting as I was hopeful that I'd have something nice to show, but things haven't quite worked out as planned:
I added a damage effect -- the "damage beans" -- on the screen edges to indicate that the player's been hurt. It's a simple post-process overlay, but with a normal map added you get a nice distortion of the screen as it fades in and out. Standard stuff for the most part. Except I have two versions, one that's a blood-splat, and one that's a nice high-res picture of actual baked beans. :D
I've also had a quick play with the audio system in UE4. My natural inclination is to integrate FMOD, but I'm hearing from fellow developers on Mastodon that UE4's system is pretty good, and from the quick tests it might well be. Audio attenuation and geometry occlusion definite seem to work, which could be enough for what I need.
But for the last 10 days or so I've been playing around with look and feel tests.
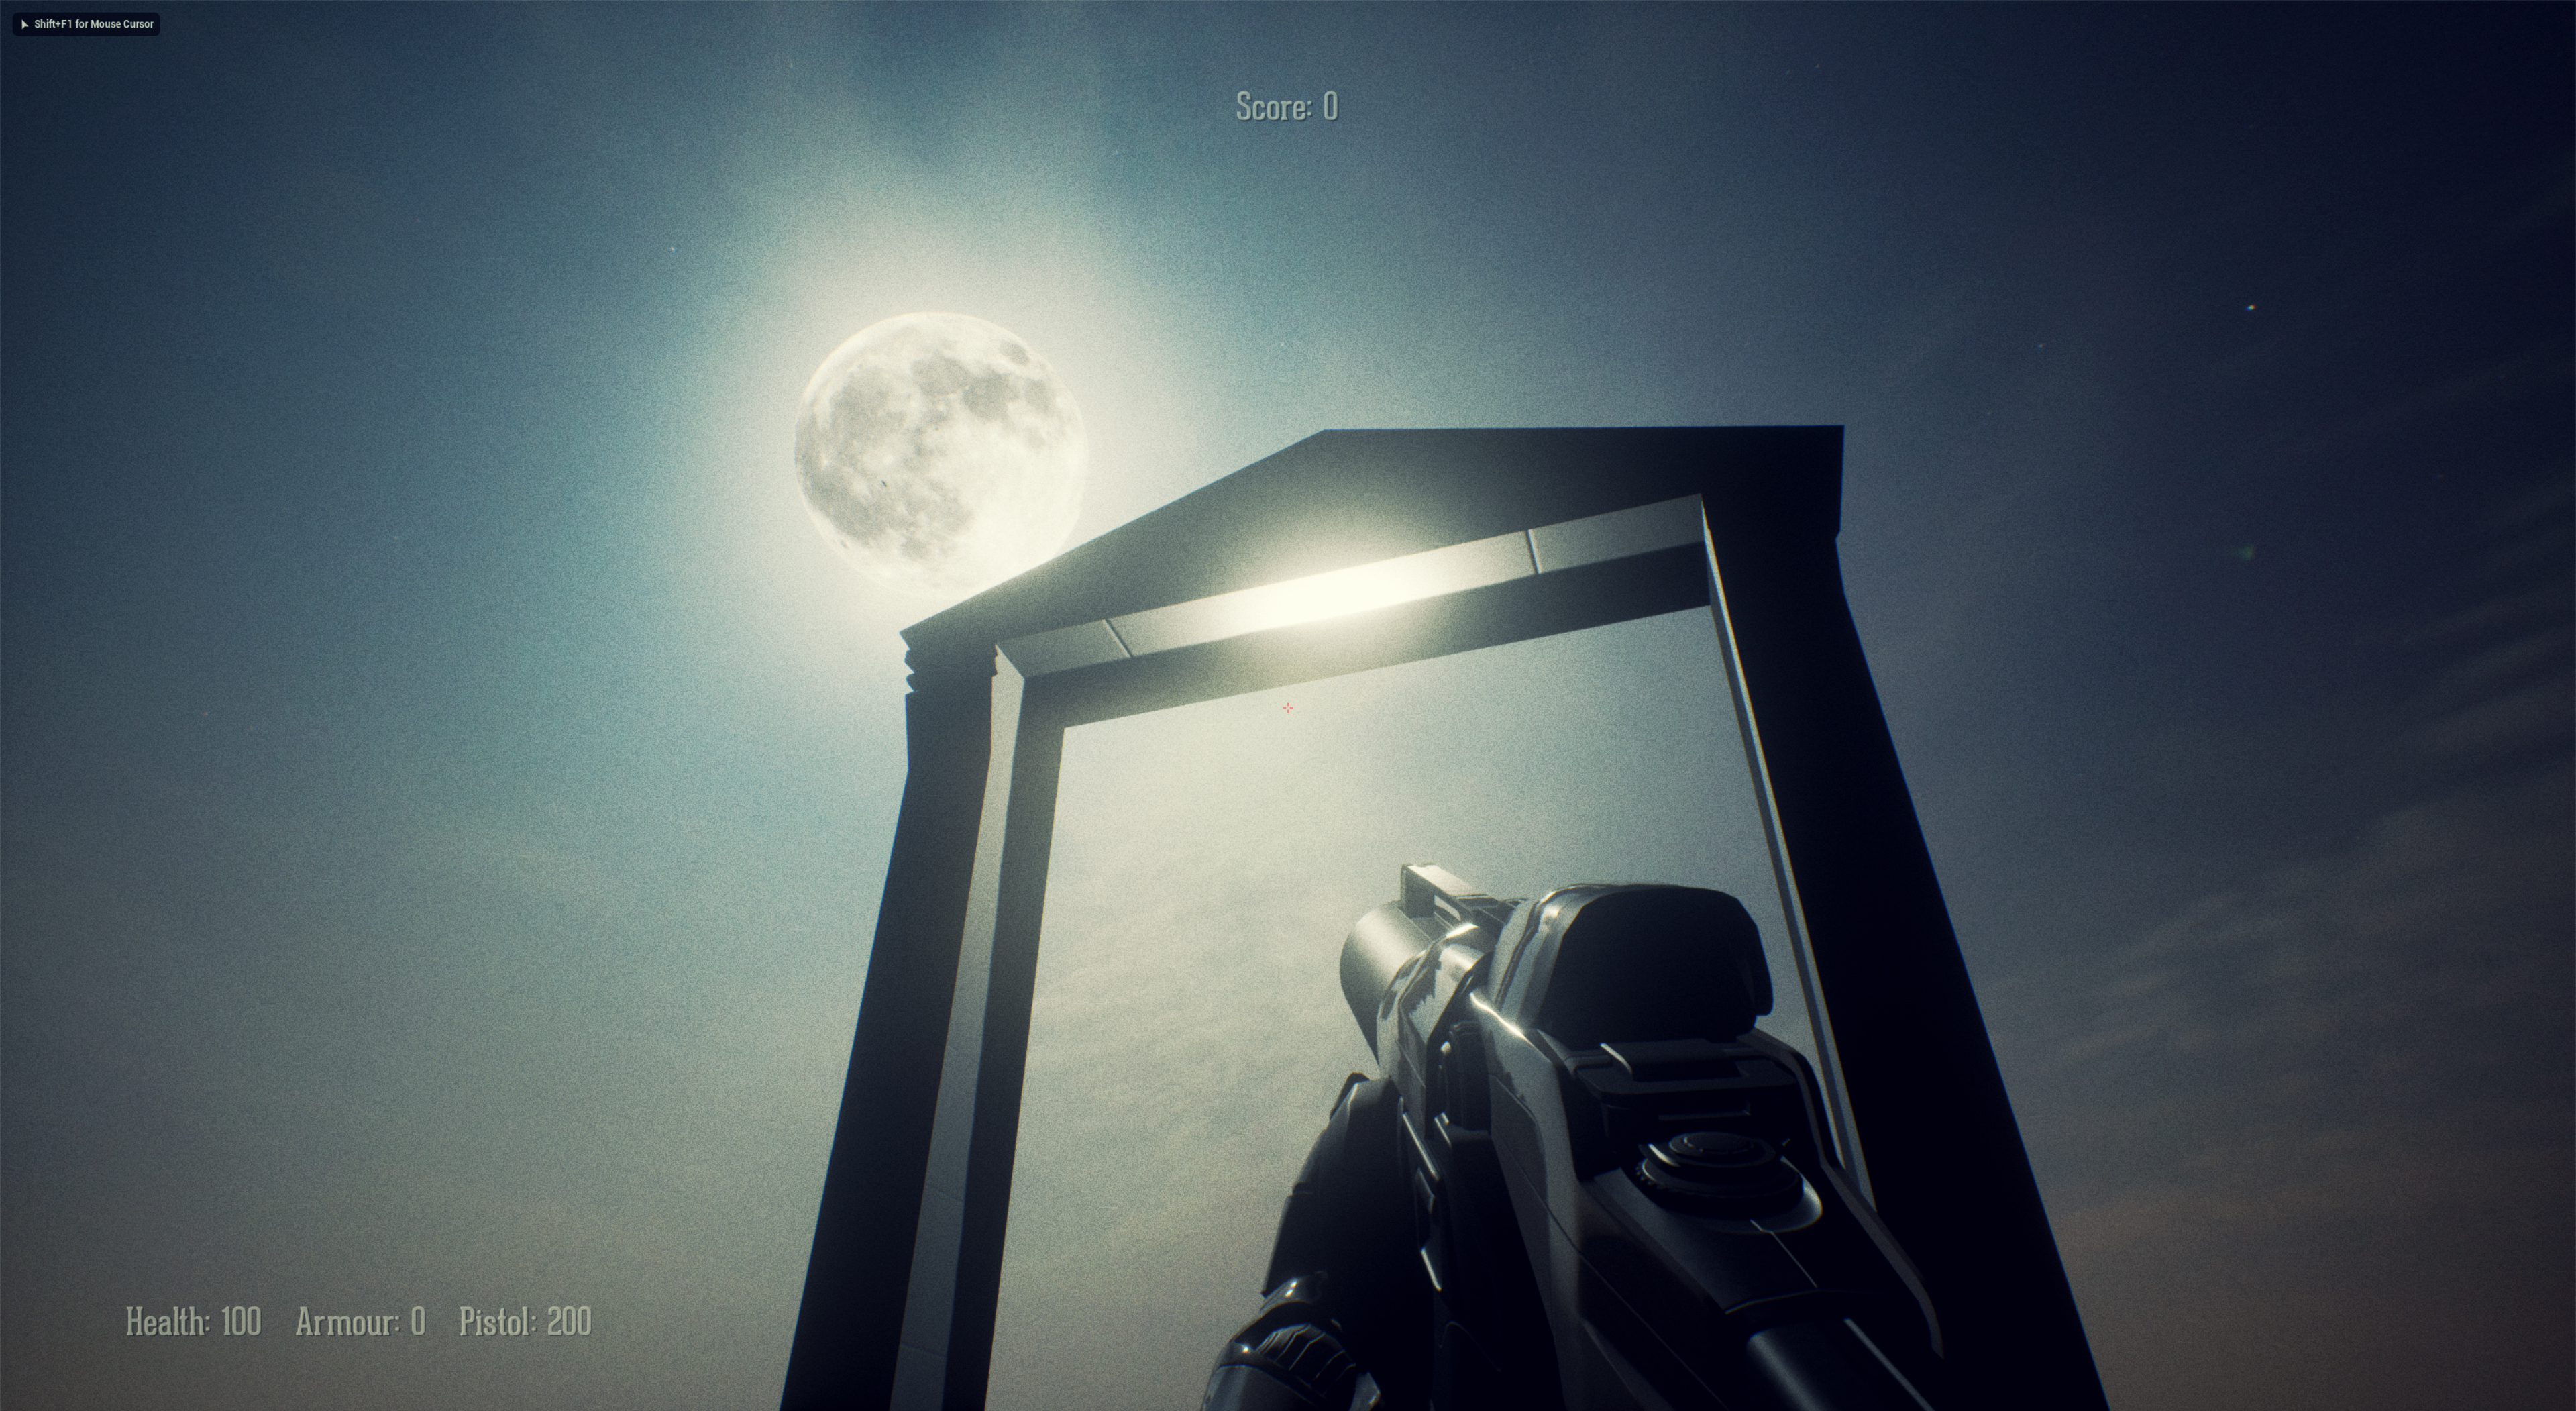
This skybox got me into a lot of trouble.
My intention with Next Game is to do everything quite low-poly and avoid as much texturing as possible. One reason for that is to look different, but texturing and modelling take time, and time/money aren't something that I have a lot of. If I have to get into texturing then I'd probably go for something old-school, like Gibhard or Strafe, but for obvious reasons I'd like to avoid that. I think every man and his dog will be doing that style in a year or two...
Unfortunately having a super realistic skybox lead me down a path where geometry got a bit too complex, and things rapidly looked incongruous when flat-shaded with high quality lighting. Basically, I couldn't get it to look good unless it was extremely high-contrast. Which was unplayable. Although, I did spend a day flirting with an entirely black-and-white grading that I might go back to for some levels.
Anyway, I've thrown away all that work. All the geometry modelled so far, the test level, the greybox, all the materials and all the textures. That stung a bit.
This week I started again, but from a better footing: I chose a nice, harmonious, palette, and put a simple gradient in the sky-box. The palette is very limited: four base colours, four shades of each colour, and a gradient from top to bottom of each colour. I'll most likely add to that over time, but for now this is working well.
UV-unwrapping can be done extremely quickly. Anything single colour can just be atlas unwrapped and pushed over the appropriate shade in the texture, while things with gradients just need a little more attention to align them properly. Because the palette is fixed, everything sits in the scene, and with some lightmass settings tweaked I'm getting really rich colour gradients, colour bounces being picked up and deep shadows. It looks better, basically. It's also super colourful, to the point of being cartoony -- far too much for this game -- but I find it easier to turn everything up to 11 and then slowly dial it in over time. (Early screenshots of Lumo are practically black because I was shooting for a Scooby-Doo vibe. The final game looks nothing like it...)
What needs sorting out now is the correct scale for things. My character moves extremely quickly, and rocket jumps go for miles. This will take a bit of two-and-fro, but that's next week's mission. At the minute everything's a little too big but I find it quite endearing. Iterate, iterate.
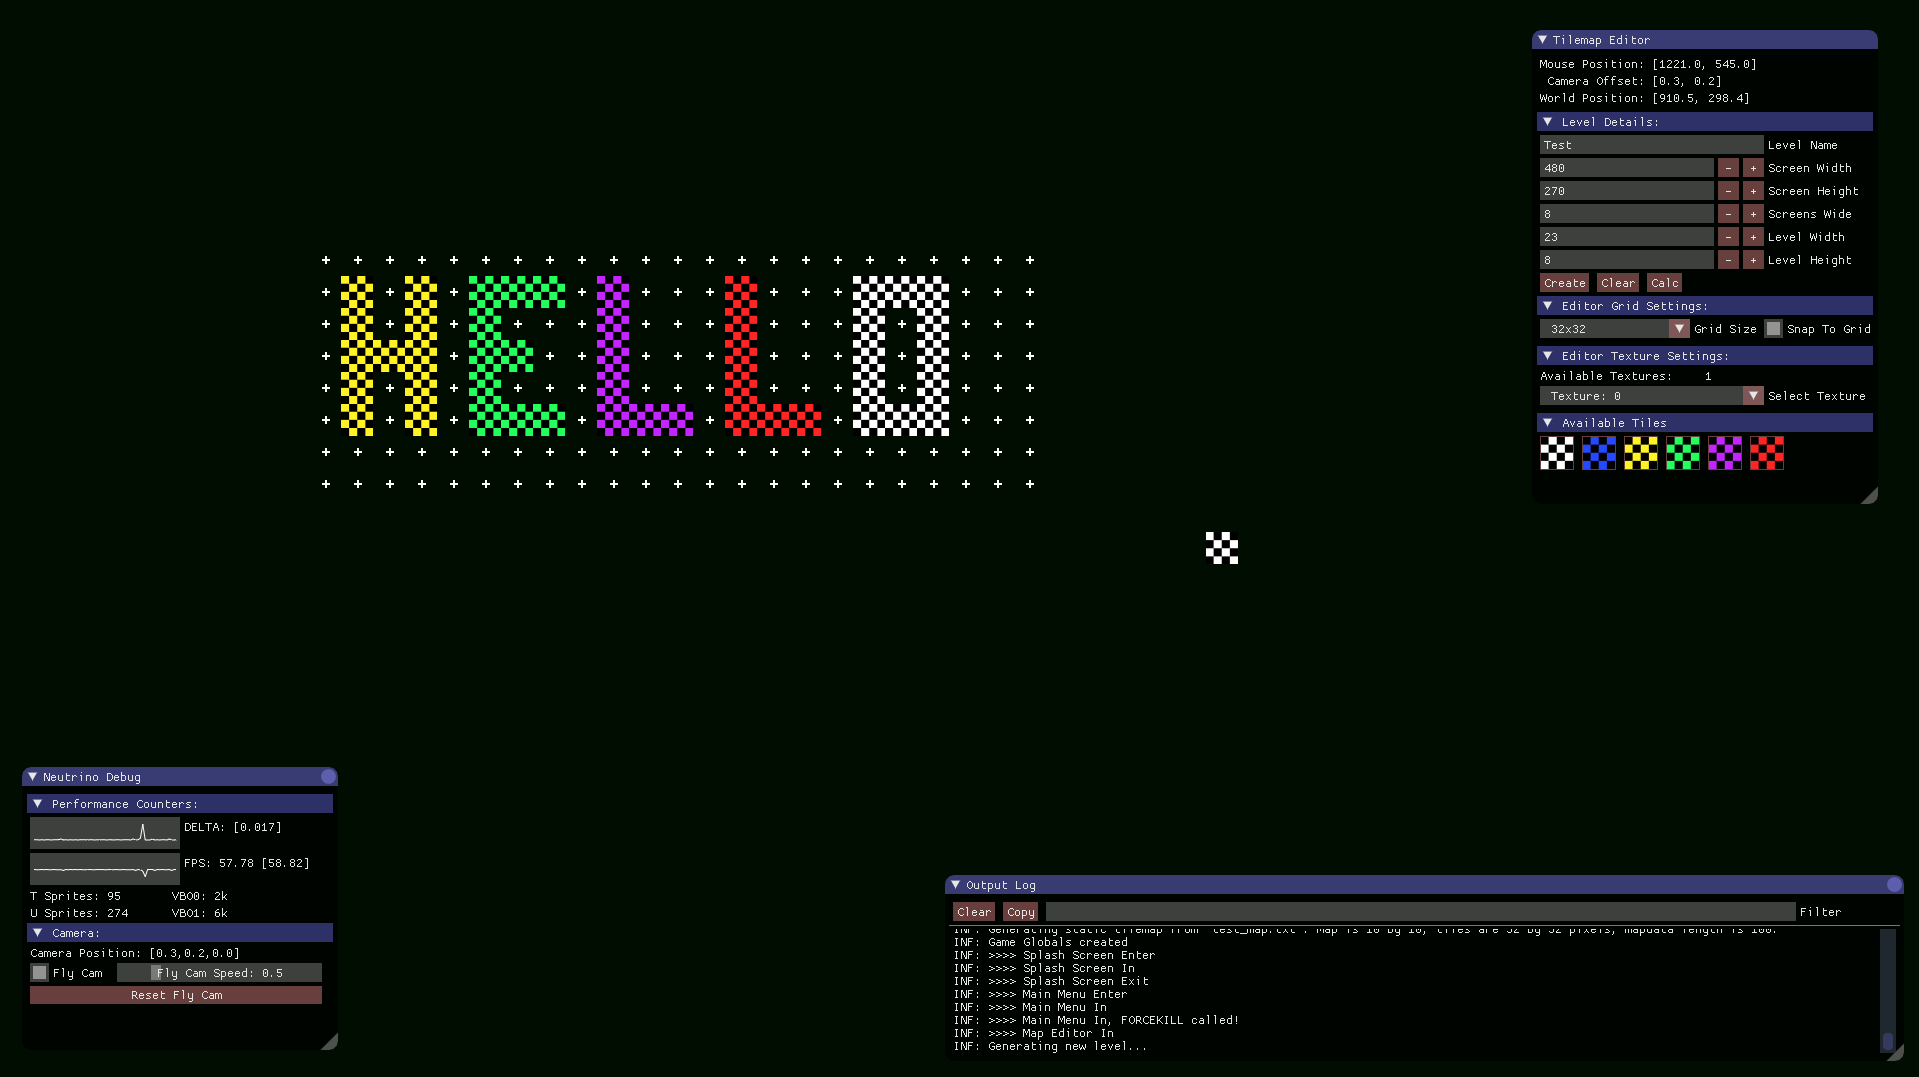
Still train-coding my way through this and the big news is, the tile map editor that I said I'd never write is basically done. It's missing the ability to create re-usable brushes from placed tiles, so I might go back and add that at some point, but bar some tidying up and deciding on the save format it's doing what I'll need. This threw up a couple of interesting things.
I was about to delve into the murk of C's directory and file-handling, which is annoyingly different depending on the platform, but decided to have a quick search through Github to see what was already out there, and came across this little gem: Tinydir, works brilliantly.
While testing the tilemap editor I thought I'd throw in some massive numbers to see how it performed. Turns out things started crawling pretty quickly, which was er, a shock. After pushing it through Richard Mitton's Very Sleepy the hot spot seemed to be in how I'm populating the VBOs, which again, was a bit of a surprise. This was supposed to be an optimised version of what I'd written a few years back on iOS...
For some reason I was only getting ~8k sprites per frame. I was expecting quite a few more. The culprit was this line:
mTransform = mTranslate * mRotation * mScale;
Pretty standard stuff, this is just creating the translation matrix which I'm pushing all my vertices through before copying the result into the VBO. (Yes, at some point I should just do all that into the shader...) I've done this before and had much better performance, except then I was using my own math class, and this time I'm using OpenGL Math. I figured it'd be better to pass off the optimisation and maintenance of my maths stuff to, well, people that know some maths.
So I dug into the operator * overload:
GLM_FUNC_QUALIFIER tmat4x4<T, P> operator*(tmat4x4<T, P> const & m1, tmat4x4<T, P> const & m2)
{
    typename tmat4x4<T, P>::col_type const SrcA0 = m1[0];
    typename tmat4x4<T, P>::col_type const SrcA1 = m1[1];
    typename tmat4x4<T, P>::col_type const SrcA2 = m1[2];
    typename tmat4x4<T, P>::col_type const SrcA3 = m1[3];

    typename tmat4x4<T, P>::col_type const SrcB0 = m2[0];
    typename tmat4x4<T, P>::col_type const SrcB1 = m2[1];
    typename tmat4x4<T, P>::col_type const SrcB2 = m2[2];
    typename tmat4x4<T, P>::col_type const SrcB3 = m2[3];

    tmat4x4<T, P> Result(uninitialize);
    Result[0] = SrcA0 * SrcB0[0] + SrcA1 * SrcB0[1] + SrcA2 * SrcB0[2] + SrcA3 * SrcB0[3];
    Result[1] = SrcA0 * SrcB1[0] + SrcA1 * SrcB1[1] + SrcA2 * SrcB1[2] + SrcA3 * SrcB1[3];
    Result[2] = SrcA0 * SrcB2[0] + SrcA1 * SrcB2[1] + SrcA2 * SrcB2[2] + SrcA3 * SrcB2[3];
    Result[3] = SrcA0 * SrcB3[0] + SrcA1 * SrcB3[1] + SrcA2 * SrcB3[2] + SrcA3 * SrcB3[3];
    return Result;
}
Ow. That's creating a lot of vec4 variables over the course of a few thousand sprites.
I admit, I'm learning GLM as I go, and maybe there're some functions to do mat4 multiplications in place but the docs make my nose bleed, and to be honest I couldn't be arsed to trawl through it all.
So instead of using a glm::mat4, my matrix is now a simple array, allocated at the start of the function, that only contains the scale and rotation. I can push the sprite corners through this and add the translation, and remove a lot of obviously zero multiplications from the process.
vBL.x = (vBL_Pos->x * s_mTransMat[0]) + (vBL_Pos->y * s_mTransMat[1]) + vPos->x;
vBL.y = (vBL_Pos->y * s_mTransMat[3]) + (vBL_Pos->y * s_mTransMat[4]) + vPos->y;
vBL.z = vPos->z;

etc. etc.
This is fine for 2D stuff, which is all I intend to use this engine for.
And the result? About a 15x speed-up. In fact, I get exactly the same number of sprites out of a single thread on my X1 laptop, as I do on my big fat devrig: ~150k @ 60fps.
I'll probably look to multi-thread this once the physics engine and fmod have been integrated, but for now it's more than good enough for a little shoot-em-up.
The moral of the story: Future Gareth, you should probably look into how to use GLM properly.
Musings, random thoughts, work in progress screenshots, and occasional swears at Unreal Engine's lack of documentation -- this is a rare insight into what happens when a supposedly professional game developer plans very little up-front, and instead follows where the jokes lead them.
Journal IndexFriends:
If you like any of my work, please consider checking out some of the fantastic games made by the following super talented people: